# Sample Integrations
## Using Spoke's Runtime Functions to integrate Twilio Studio with Spoke's Programmable Softphone
### Overview
You can get up and running quickly with Spoke and Twilio Studio by leveraging Spoke's Directory API and our open source Twilio Runtime Functions.
1. The Spoke Directory API provides you with programmable lookup into the Spoke Unified Directory. The response payload includes real time availability of Spoke Users and Teams, enabling you to make routing decisions based on real time presence and availability.
2. Get the [Spoke Twilio Runtime functions here](https://github.com/spoke-ph/twilio-runtime-spoke-api). These functions deploy into your Twilio account and give you quickstart access to the Spoke Directory API from Twilio Studio.
>Before getting started, we recommend you read the [Core Concepts](/core-concepts) section above to familiarise yourself with the Spoke Directory structure and how Twilio calls integrate with Spoke.
>To follow along with this guide, you'll need a free Spoke developer account, deployed into your Twilio account, (get one at https://account.spokephone.com/twilio) and you should have set your Spoke account up with 1 or 2 users.
### How To: Basic Studio Flow Using getExtension Function and twimlRedirectUrl
In this How To, we're going to show you how to quickly get a Twilio Studio flow connecting to Spoke using the Directory API and Twilio Runtime Functions.
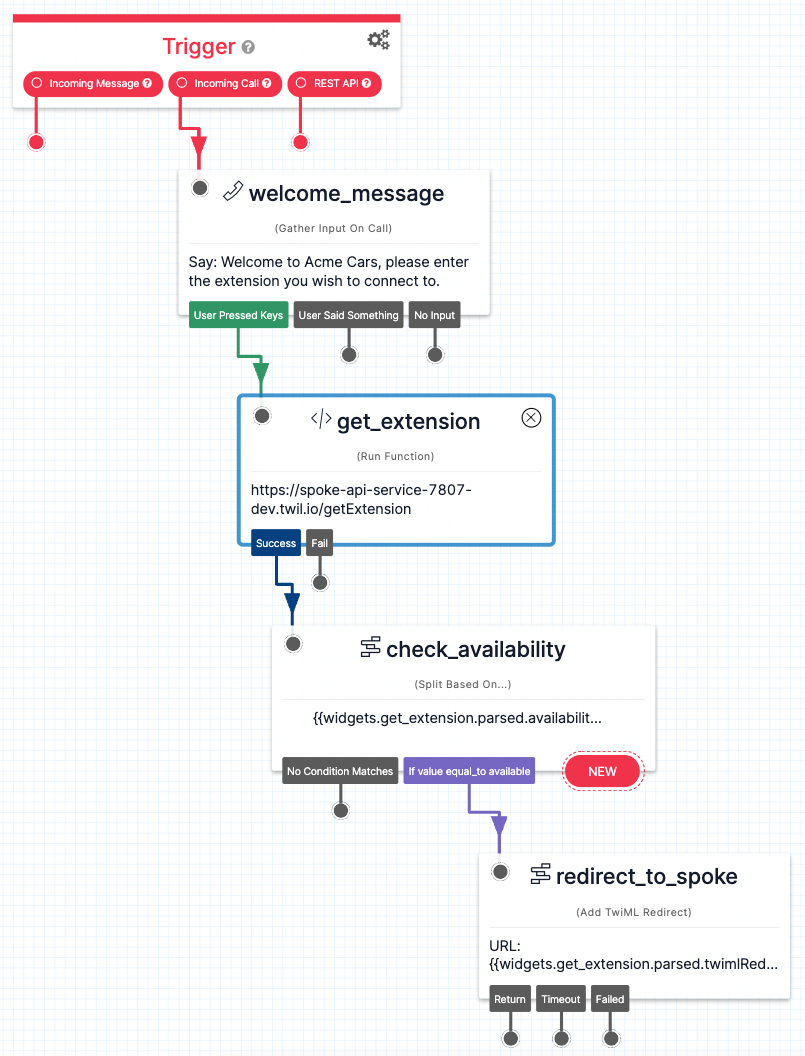 The above Studio flow leverages the `getExtension` function to check availability of a Spoke directory entry, and if it is available send the call over to that extension.
**1. Setup**
To get started, you'll need to deploy the Spoke Twilio Runtime Functions into your account, then create a Studio Flow attached to a Twilio phone number, and add a Gather widget.
**2. Add Run Function widget**
To access one of the functions you just deployed from a Studio flow, drop a `Run Function` widget into your flow and connect it to the `User Pressed Keys` output out of your `Gather` widget. From here, select the `SERVICE`, `ENVIRONMENT`, and `FUNCTION` you want to run:
The above Studio flow leverages the `getExtension` function to check availability of a Spoke directory entry, and if it is available send the call over to that extension.
**1. Setup**
To get started, you'll need to deploy the Spoke Twilio Runtime Functions into your account, then create a Studio Flow attached to a Twilio phone number, and add a Gather widget.
**2. Add Run Function widget**
To access one of the functions you just deployed from a Studio flow, drop a `Run Function` widget into your flow and connect it to the `User Pressed Keys` output out of your `Gather` widget. From here, select the `SERVICE`, `ENVIRONMENT`, and `FUNCTION` you want to run:
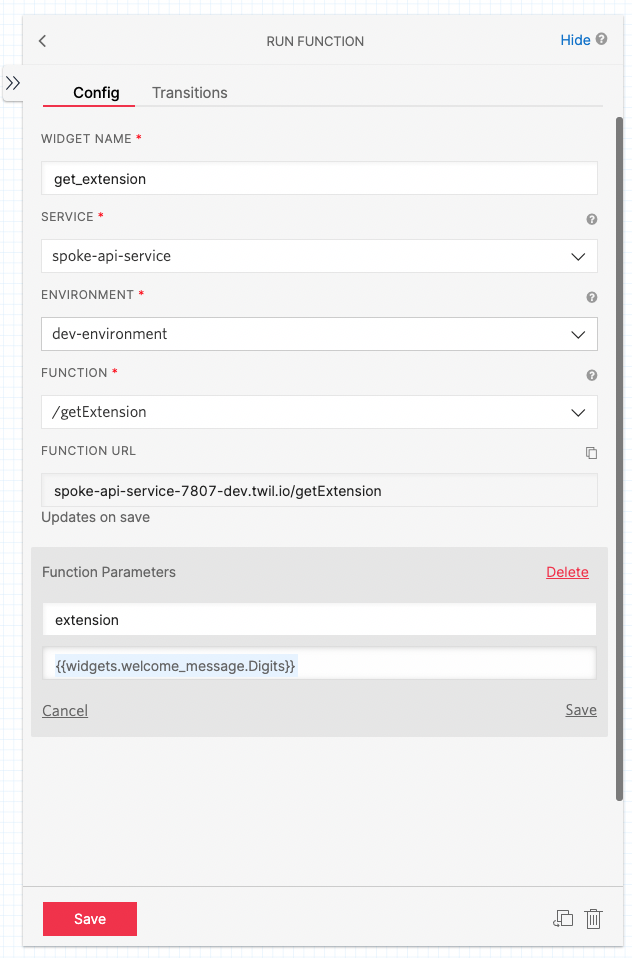 You will need to add one parameter to the function, called `extension`, and set the value to `{{widgets.welcome_message.Digits}}`.
The getExtension function returns the following fields by default.
1. **displayName** - The display label of the directory entry
2. **type** - The type (`userWithAvailability`, `teamWithAvailability` etc) of the directory entry
3. **status** - The current (real time) availability of the directory entry
4. **availabilitySummary** - Human readable availability summary
5. **twimlRedirectUrl** - Redirect the call to this url to connect the caller to the directory entry
You can change the function to return any directory entry fields - these are documented in the [`GET /directory`](/api/directory) section of the developer reference.
**3. Add Split Widget**
The split widget allows you to branch your flow based on a matching condition. Drop a `Split` widget into your flow and connect it to the `Success` output of the `Run Function` widget.
You will need to add one parameter to the function, called `extension`, and set the value to `{{widgets.welcome_message.Digits}}`.
The getExtension function returns the following fields by default.
1. **displayName** - The display label of the directory entry
2. **type** - The type (`userWithAvailability`, `teamWithAvailability` etc) of the directory entry
3. **status** - The current (real time) availability of the directory entry
4. **availabilitySummary** - Human readable availability summary
5. **twimlRedirectUrl** - Redirect the call to this url to connect the caller to the directory entry
You can change the function to return any directory entry fields - these are documented in the [`GET /directory`](/api/directory) section of the developer reference.
**3. Add Split Widget**
The split widget allows you to branch your flow based on a matching condition. Drop a `Split` widget into your flow and connect it to the `Success` output of the `Run Function` widget.
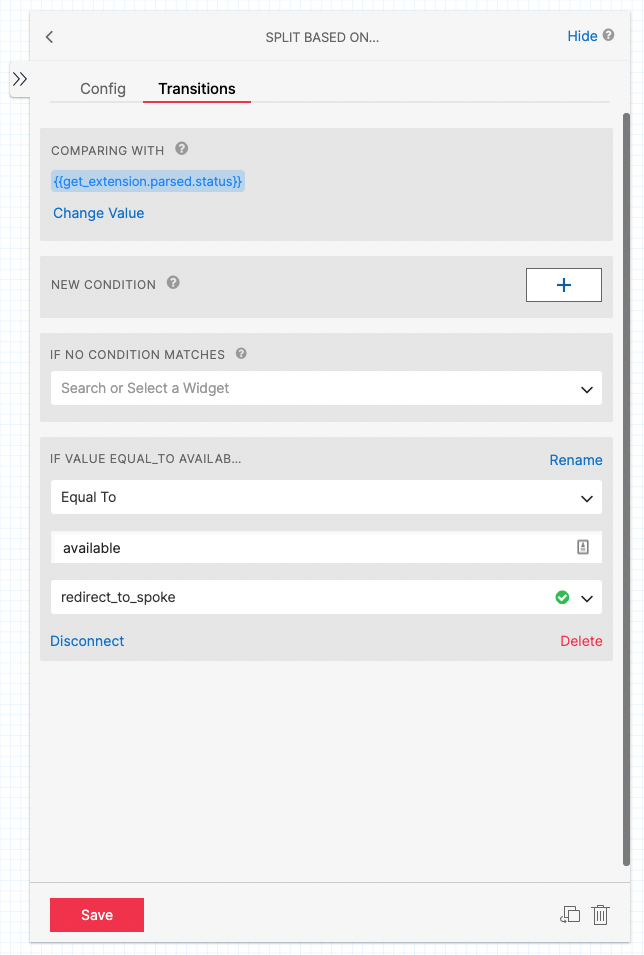 In this case we are branching based on the `status` field - and will only send the call to the directory entry associated with the extension if the entry is available. You can access the response body fields from the run function widget using the following path: `{{widgets.[run_function_widget_name].parsed.[field_name]}}`.
In this case, we want to check the availability status of the extension, so we check that the `widgets.get_extension.parsed.status` field is equal to `available`
**4. Add Redirect Widget**
The final step is to add the redirect widget which will send the incoming call across to the Spoke extension. Drop a `TwiML Redirect` widget into your flow and connect it to the `If value equal to available` output of the `Split` widget.
In this case we are branching based on the `status` field - and will only send the call to the directory entry associated with the extension if the entry is available. You can access the response body fields from the run function widget using the following path: `{{widgets.[run_function_widget_name].parsed.[field_name]}}`.
In this case, we want to check the availability status of the extension, so we check that the `widgets.get_extension.parsed.status` field is equal to `available`
**4. Add Redirect Widget**
The final step is to add the redirect widget which will send the incoming call across to the Spoke extension. Drop a `TwiML Redirect` widget into your flow and connect it to the `If value equal to available` output of the `Split` widget.
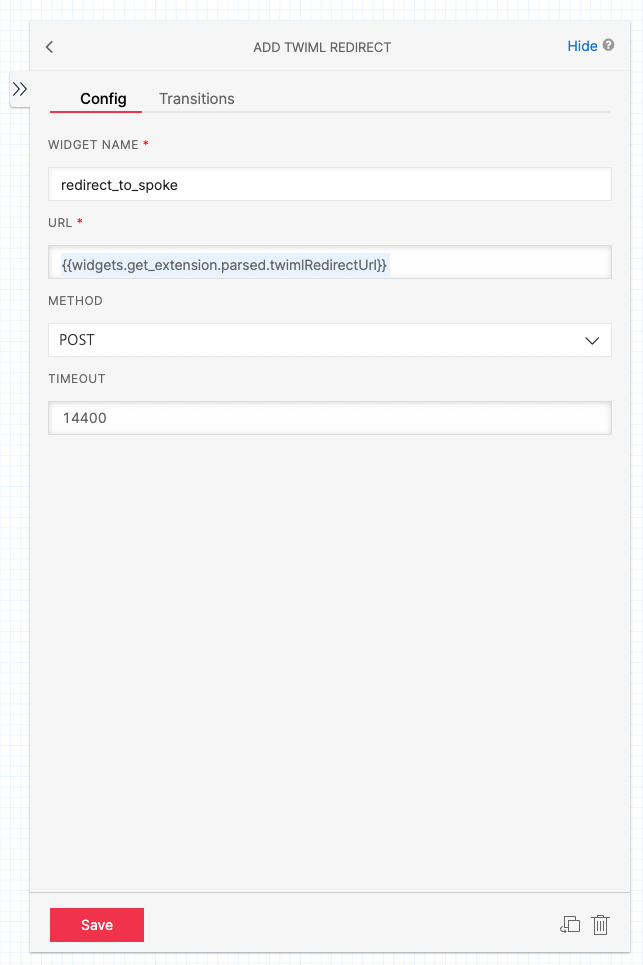 Configuring this widget is simple - you just need to set the `URL` field to `{{widgets.get_extension.parsed.twimlRedirectUrl}}`
**5. Publish and test your flow**
That's it! Now all you need to do is publish your flow, and test that it works.
To test, dial the incoming number attached to your Studio flow, and when you hear the gather prompt, enter the extension of one of your Spoke users. If you've configured everything correctly, the call should connect through to the user's softphone on Spoke.
### Review
This How To has introduced you to creating a basic Studio flow connected to a Spoke softphone, using the Spoke Directory API and Runtime functions. This only scratches the surface of what you can build.
Here are some other ideas to explore:
* Return the caller back to the initial gather menu if the extension is not found
* Add a second gather widget to the `No condition matches` output of the `Split` widget and build a new flow around the extension being unavailable - maybe send the caller to a Flex queue.
* Use the optional `returnTo` and `returnToId` parameters to return the call to your flow if the call goes unanswered in Spoke.
## Microsoft Power Automate to Dynamic 365
### Overview
> The Power Automate package is provided as an example set of templates to get you started with the most common
> integration scenarios from Spoke to Dynamics 365. We expect anyone using the provided templates to accept and own the
> operation and management of these example Microsoft Power Automate flows and ensure it is fit for purpose in the
> environment it is installed.
Power Automate is a service that helps you create automated workflows between your favorite apps and services, to synchronize files, get notifications, collect and update data, and more.
Power Automate is an ideal solution for customers using Microsoft, to integrate new and existing workflows to Spoke Phone, and take advantage of owning the integration and business workflows end to end.
Spoke has created a set of example template flows to get a customer up and running with the most common scenarios using MS Power Automate to integrate Spoke to Dynamics 365.
[Read the DISCLAIMER before downloading the samples](https://sp-static-assets-prod.s3.amazonaws.com/sampleIntegrations/microsoft/powerAutomate/DISCLAIMER.txt)
[Download the User Guide](https://sp-static-assets-prod.s3.amazonaws.com/sampleIntegrations/microsoft/powerAutomate/SpokePhone_PowerAutomate_Dynamics365_Guide.pdf)
[Download the Microsoft Power Automate to Dynamics 365 samples](https://sp-static-assets-prod.s3.amazonaws.com/sampleIntegrations/microsoft/powerAutomate/SpokePhone_Dynamics365.zip)
[Download the postman collection of sample Spoke webhook events](https://sp-static-assets-prod.s3.amazonaws.com/sampleIntegrations/microsoft/powerAutomate/PowerAutomate_SpokePhone_Dynamics365_webhooks.postman_collection.json)
Configuring this widget is simple - you just need to set the `URL` field to `{{widgets.get_extension.parsed.twimlRedirectUrl}}`
**5. Publish and test your flow**
That's it! Now all you need to do is publish your flow, and test that it works.
To test, dial the incoming number attached to your Studio flow, and when you hear the gather prompt, enter the extension of one of your Spoke users. If you've configured everything correctly, the call should connect through to the user's softphone on Spoke.
### Review
This How To has introduced you to creating a basic Studio flow connected to a Spoke softphone, using the Spoke Directory API and Runtime functions. This only scratches the surface of what you can build.
Here are some other ideas to explore:
* Return the caller back to the initial gather menu if the extension is not found
* Add a second gather widget to the `No condition matches` output of the `Split` widget and build a new flow around the extension being unavailable - maybe send the caller to a Flex queue.
* Use the optional `returnTo` and `returnToId` parameters to return the call to your flow if the call goes unanswered in Spoke.
## Microsoft Power Automate to Dynamic 365
### Overview
> The Power Automate package is provided as an example set of templates to get you started with the most common
> integration scenarios from Spoke to Dynamics 365. We expect anyone using the provided templates to accept and own the
> operation and management of these example Microsoft Power Automate flows and ensure it is fit for purpose in the
> environment it is installed.
Power Automate is a service that helps you create automated workflows between your favorite apps and services, to synchronize files, get notifications, collect and update data, and more.
Power Automate is an ideal solution for customers using Microsoft, to integrate new and existing workflows to Spoke Phone, and take advantage of owning the integration and business workflows end to end.
Spoke has created a set of example template flows to get a customer up and running with the most common scenarios using MS Power Automate to integrate Spoke to Dynamics 365.
[Read the DISCLAIMER before downloading the samples](https://sp-static-assets-prod.s3.amazonaws.com/sampleIntegrations/microsoft/powerAutomate/DISCLAIMER.txt)
[Download the User Guide](https://sp-static-assets-prod.s3.amazonaws.com/sampleIntegrations/microsoft/powerAutomate/SpokePhone_PowerAutomate_Dynamics365_Guide.pdf)
[Download the Microsoft Power Automate to Dynamics 365 samples](https://sp-static-assets-prod.s3.amazonaws.com/sampleIntegrations/microsoft/powerAutomate/SpokePhone_Dynamics365.zip)
[Download the postman collection of sample Spoke webhook events](https://sp-static-assets-prod.s3.amazonaws.com/sampleIntegrations/microsoft/powerAutomate/PowerAutomate_SpokePhone_Dynamics365_webhooks.postman_collection.json)